
2-Inch vs 3-Inch Lift: Which Is Right for Your Daily Driver?
Quick Answer for Most Drivers (Featured Snippet Box)
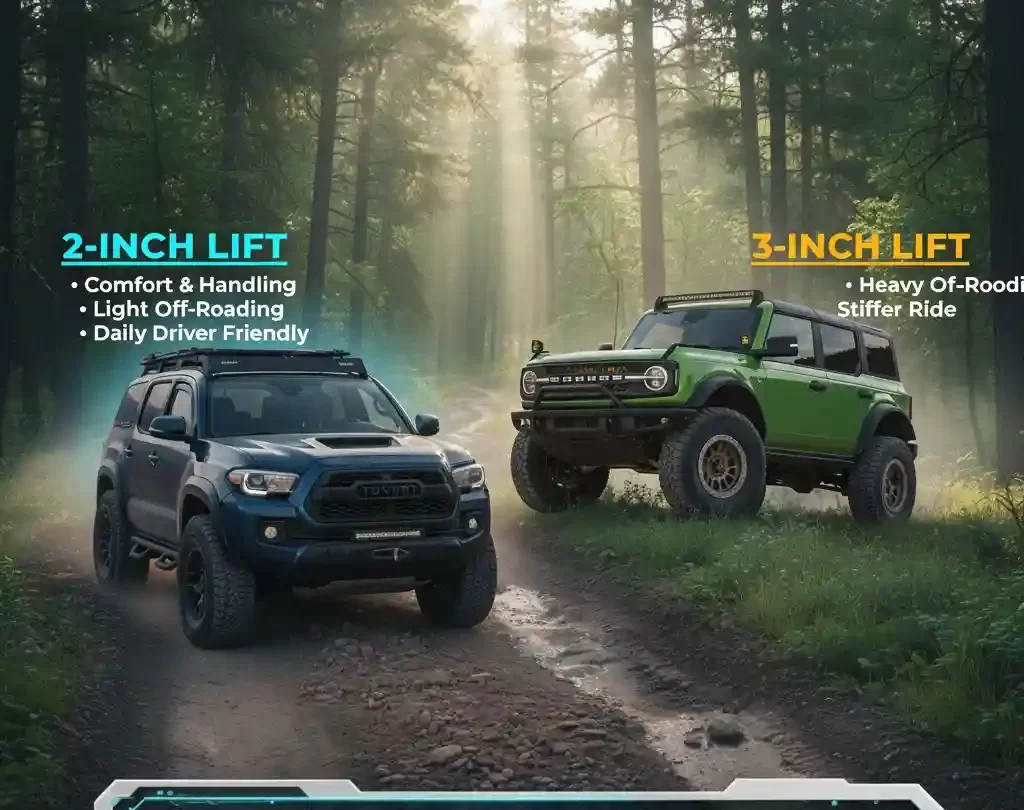
Choose 2″ if you commute daily, want stock-like manners, and plan on 33″ tires with minimal trimming and simple alignment.
Choose 3″ if you want more trail clearance and often 34–35″ tires, and you’re OK adding geometry parts (often UCAs/diff drop), trimming, and a higher budget.
One extra inch usually means more cost, more complexity, more wear—balance it against how you actually drive.
The One-Inch Question That Changes Everything
If you daily your rig, a lift kit isn’t just a “look”—it’s a stack of trade-offs. That mysterious inch between 2-inch vs 3-inch lift can decide whether your 33s cruise to work like stock…or your 35s introduce you to words like caster, backspacing, and “why do my fender liners look chewed?” Think of this guide as your friendly service writer who also wheels on weekends: a little humor, a lot of practical science, and zero fluff.
Here’s the big picture. A 2″ lift is the commuter’s sweet spot: easier alignment, fewer geometry band-aids, and manners your passengers won’t complain about. A 3″ lift buys real off-road clearance and tire room, but it also nudges you toward upper control arms (UCAs), possible diff drops on many IFS trucks, and more trimming. Both options change ride quality, MPG, braking, and headlight aim—the question is how much change you want to manage Monday through Friday.
We’ll translate the nerdy bits (CV angles, droop vs preload, wheel offset/backspacing) into real-world outcomes: Will your steering re-center? Will your alignment tech hit target caster without UCAs? Where will 33s or 35s actually rub—and how much trimming fixes it? You’ll get comparison tables, quick fitment math, and a no-BS decision checklist so you can choose confidently.
What you’ll learn (and actually use):
- How lift height interacts with tire size (33s vs 34/35s), wheel offset, and rub points.
- The geometry basics that keep a daily driver happy: caster targets, CV angles, bump-stop spacing, and why droop matters.
- Realistic impacts on ride quality, MPG, braking, and wear—and when UCAs, diff drops, or gearing are worth it.
- A printable install/alignment checklist and a 60-second decision tree to pick your setup.
What a Lift Actually Changes (and Why It Matters for Daily Driving)
You’re not just “making it taller.” A 2-inch vs 3-inch lift changes geometry, grip, braking, headlights—even how your alignment tech feels about you. Here’s the plain-English breakdown (with just enough nerd to keep you safe and happy on the commute).
Ground Clearance & Angles — Approach, Breakover, Departure (and Tire Size Magic)
What it is:
- Approach angle: how steep a face you can climb before the bumper kisses it.
- Breakover angle: how big a hump you can crest before the belly drags.
- Departure angle: the “leaving shot” so your rear bumper doesn’t plow the dirt.
Lift vs tire diameter (the team-up):
- Suspension lift raises the body/frame relative to the axles: better approach/departure and breakover because bumpers and belly are higher.
- Tire size raises everything off the ground: +2″ tire diameter = +1″ diff/axle clearance (half the diameter). That’s huge for rocks and ruts.
Quick math (bookmark this):
- Each +1″ of suspension lift → a direct bump to approach/departure/breakover (varies by bumper/tire).
- Each +2″ of tire diameter → +1″ true ground clearance at the lowest point (diff pumpkin).
- Wheelbase matters: long wheelbase = worse breakover; a 3″ lift helps more here than it does on a short rig.
Suspension Geometry — Caster, Camber, Toe; CV/Driveshaft Angles; Droop vs Preload; Bump Stops
Alignment (daily-driver sanity):
- Caster: the big one for stability and self-centering. Most IFS trucks drive best around +3.5° to +4.5° after a lift. At 3″, factory arms often can’t hit target—you’ll want Upper Control Arms (UCAs) with added caster.
- Camber: aim near 0° (slight negative for some).
- Toe: usually a small toe-in keeps highway tracking happy.
CV/driveshaft angles (IFS reality):
- Lifting increases CV angles. At 3″, many platforms benefit from a diff drop to reduce boot stress, clicks, or vibes under throttle.
- Keep an ear out for boot weep, clicking, or oscillation—that’s your early warning.
Droop vs preload (why spacer-only kits can feel harsh):
- Droop is the suspension’s down-travel—crucial for ride quality and traction.
- Excess preload (or tall spacers) can reduce droop → top-out clunks and a choppy ride. Quality coilovers with proper spring rate preserve droop.
Bump-stop spacing:
- Bigger tires need the right bump-stop length to prevent fender or liner carnage at full compression.
- If you hear “schrrrrp” on speed bumps, you’re learning this lesson the loud way.
Image idea: “Caster and CV angle callouts” (alt: caster targets and cv angle diagram after 3 inch lift).
Vehicle Dynamics — Center of Gravity, Mass, and Braking Distance
Center of gravity (CG):
- Higher CG = more body roll and weight transfer. Good shocks and sway-bar tuning keep the daily-driver feel civilized.
Unsprung & rotational mass:
- Heavier wheels/tires hurt acceleration and braking more than a pound on the roof ever will.
- 33s vs 35s: expect a noticeable increase in rotational inertia; stopping distances lengthen and downshifts happen earlier.
Braking & gearing:
- Bigger tires change effective gear ratio. If the truck feels sluggish or hunts gears, consider re-gearing (especially for 35s).
- Brake upgrades (pads/rotors) restore confidence when you add tire mass.
Comfort & NVH — Shock Valving, Spring Rate, and Bushings
Shocks matter more than height.
- Monotube shocks = crisp control and better heat management for daily bumps; twin-tube can feel softer but fade faster.
- Valving should match your actual weight (bumpers/winch/rack). Under-damped trucks float; over-damped trucks chatter.
Springs & ride feel:
- Too-stiff front springs for a winch you don’t have = nose that never settles.
- Rear leaf add-a-leafs or light progressive coils can lift without beating you up.
Bushings & squeaks:
- Rubber = comfort/quiet; poly = precision with potential squeak if dry. A little silicon grease goes a long way.
Electronics & Legal — Headlight Aim, ADAS, Speedo/Odo, Height Rules
Headlight aim (be a hero to oncoming traffic):
- Lifts point beams up. Park ~25 ft from a wall, measure the cutoff vs factory spec, and re-aim. It’s 5 minutes that saves 5 years of high beams in your face.
ADAS (driver-assist) checks:
- Cameras/radars don’t like geometry changes. After a bigger lift or bumper swap, some platforms need recalibration so lane-keep and adaptive cruise behave.
Speedometer/odometer:
- Larger tires = slower-reading speedo. Use a tuner/recalibrator so shift points, ABS, and your MPG readouts make sense again.
Bumper and lighting height rules:
- States have max/min headlight/bumper heights. A mild lift on stock bumpers is usually fine; just know the limits if you go high-clearance.
Daily-Driver Cheat Sheet — Quick Wins & Red Flags
- Quick wins: Quality shocks, correct caster, modest wheel offset (avoid crazy poke), speedo recal, headlight re-aim.
- Watch for: Top-out clunks (no droop), steady tire rub on turns, vibration under throttle (CV angle), wandering highway steering (low caster).
- 2″ vs 3″ sanity: 2″ = simpler alignment and 33s; 3″ = more clearance and 34–35s but plan for UCAs, possible diff drop, and more trimming.
Pro Tip (SEO + UX)
Sprinkle real photos or diagrams through this section with descriptive alt text and filenames like 2-inch-vs-3-inch-lift-approach-angle.webp, cv-angle-diff-drop-diagram.webp, and headlight-aim-after-lift.webp. It helps Google Image visibility and keeps readers engaged.
The 2-Inch Lift — The Daily Driver Sweet Spot
Two inches doesn’t sound like much…until you see your rig in a parking lot looking tougher, clearing curbs, and still behaving like a civilized commuter. A 2-inch lift is the “goldilocks” of daily drivers: enough height to matter, not enough to create a science project.
Typical Parts & Install Complexity (What You Actually Bolt On)
The common paths:
- Spacer/level kit (budget, quick): front top-hat spacers to level rake; often paired with slightly longer or re-valved shocks.
- Entry coilovers + rear springs/AAL (best manners): adjustable ride height, better damping; rear add-a-leaf or light-rate coils to match.
- Quality monotube shocks (recommended): tighter control, better heat management than twin-tube.
Why it’s easy at 2″:
- Alignment: Usually returns to spec with factory arms; target caster ~+3.5° to +4.5° on many IFS trucks for straight-line stability.
- No panhard/track-bar correction needed on IFS. (Solid-axle rigs typically still look good at 2″, but check axle centering.)
- Install time: 3–6 hours DIY with common tools; a weekend with pizza, a torque wrench, and a patient friend.
Pro tip: After any lift, re-torque all fasteners at 500–1,000 miles, then every oil change.
Ride, MPG, and Noise (Will It Still Drive Like a Car?)
- Ride quality: With decent shocks, a 2″ setup feels near-stock—less pitch, less float, more control. Spacer-only kits can reduce droop and feel choppy; good dampers fix that.
- MPG: The height alone is a minor hit; tires are the real MPG killer. Heavier/wider tread = more rolling resistance.
- Tire noise: All-Terrain (AT) patterns are daily-friendly; Mud-Terrain (MT) looks rad but hums like a choir at 65 mph.
Speedo sanity: If you jump tire sizes (e.g., 265 → 285/70R17), use a recalibrator/tuner so shift points and ABS logic stay happy.
Fitment & Trimming (Real Rigs, Real Numbers)
What most people want to know: “Can I run 33s with a 2-inch lift?”
Short answer: Yes on many platforms—with the right wheel offset/backspacing and minor trimming or liner pushes.
Platform | Typical Result at 2″ | Wheel Notes | Trimming Notes |
Tacoma / Frontier (IFS) | 33″ (285/70R17) common | +0 to +15 mm offset keeps poke/rub in check | Heat-gun liner push; mild pinch-seam or mount kiss |
4Runner / Bronco (IFS) | 33″ easy; 34″ possible w/ care | 0 to +15 mm typical | Liner push; fog bezel/valance awareness |
Wrangler / Gladiator (Solid) | 35″ is often doable | Stock or slight negative offset | Set bump stops; watch fender flare/lock-to-lock clearances |
F-150 / Silverado / RAM 1500 (IFS) | 33″ comfortable | +0 to +18 mm common | Liner massage; air dam/valance trims |
Geometry reminder: More negative offset pushes the tire out (cool stance), but increases rub arc. Stay conservative for a hassle-free daily.
Pros & Cons (So You Don’t Regret Anything)
Pros
- Lowest total cost (parts + install).
- Easiest alignment; factory arms usually hit caster.
- Lightest weight gain → better ride/MPG than bigger lifts.
- Resale-friendly and insurance-friendly.
Cons
- Limited headroom for true 35s on many IFS trucks without significant trimming/wheel changes.
- Spacer-only kits can reduce droop and cause top-out clunks—invest in proper shocks/coilovers.
Pros & Cons (So You Don’t Regret Anything)
- Shocks: Quality monotube matched to your real weight (bumper/winch plans?).
- Alignment sheet: Ask for caster ~+3.5°–+4.5°, camber near 0°, slight toe-in.
- Wheels/tires: Choose an AT in the 33″ class; keep offset moderate to avoid rub.
- Headlights: Re-aim after lift (oncoming drivers will thank you).
- Speedo/TPMS: Recalibrate if you upsized tires.
- Trim kit: Heat gun + push pins for liner tweaks; plan bump stops on solid-axle Jeeps.
Image Ideas (SEO-Ready Captions & Alt Text)
- Before/After stance, stock vs 2″ on 33s
- Alt: 2 inch lift daily driver before after 33 inch tires
- Wheel offset diagram showing rub arc
- Alt: wheel offset backspacing rubbing diagram 2 inch lift
- Alignment targets callout (caster focus)
- Alt: caster settings after 2 inch lift alignment sheet
Bottom line
If your week is 90% pavement and 10% fun, a 2-inch lift is the sweet spot: clean stance, 33s with minimal drama, and manners your passengers—and your alignment tech—will appreciate. Save the extra inch (and extra complexity) for when you truly need 34–35s and more trail clearance.
The 3-Inch Lift — More Clearance, More Supporting Parts
Three inches is where your rig goes from “nicely leveled” to “yep, that one wheels.” You’ll gain real trail clearance and tire room—but you’ll also step into geometry, trimming, and setup details that a 2″ lift often avoids. Think of 3″ as more capability + more responsibility.
Typical Parts & Install Complexity (What a 3″ Setup Really Includes)
- Coilovers + springs/leafs: Height + damping you can tune to actual weight (bumper, winch, rack).
- Upper Control Arms (UCAs): On many IFS trucks, you need UCAs to hit proper caster and keep the ball-joint/uni-ball happy.
- Diff drop (IFS): Reduces CV angles to save boots and vibes.
- Extended links/lines: Longer sway-bar links and sometimes brake lines to keep full droop safe.
- Bump stops: Set compression limits so big tires don’t self-clearance your fenders.
- Pro alignment: You’re paying for numbers here—caster, camber, toe dialed to a daily-driver target.
Installer sanity: Budget 6–10 hours, add time for stuck hardware and trimming. Re-torque everything after 500–1,000 mi.
Ride, MPG, and Wear (Daily Manners with Big-Boy Parts)
- Ride/handling: Slightly more body motion at 3″. Good coilover valving keeps it composed; poor damping turns whoops into pogo sticks.
- MPG & brakes: Larger tires = more rotational mass → expect an MPG dip and longer stopping distances. Consider pad/rotor upgrades.
- Wear items: Keep an eye on CV boots, ball-joint/uni-ball angles, and tie-rod geometry. Service/inspection intervals often get tighter at 3″.
Gearing note: 35s can make automatics gear-hunt. Re-gearing restores pep, shift points, and towing manners.
Fitment & Trimming (Real Platforms, Real Expectations)
You’re now in 34–35″ tire territory on many rigs—with the right wheel specs and more trimming than a 2″ lift.
Platform | Common Tire at 3″ | Wheel Specs (typical) | What to Trim/Tune |
Tacoma / Frontier (IFS) | 34–35″ possible | 17×8.5, 0 to −12 mm offset | Liner push, pinch-seam, body mount chop on some gens, UCAs required |
4Runner (IFS) | 34–35″ | 17×8.5, 0 to −10 mm | Liner heat-gun, bumper/fog valance, UCAs, diff drop helps |
Bronco (IFS) | 35″ (Sasquatch easy) | 17×8.5, −12 mm | Crash-bar delete (if equipped), liner tweaks, headlight re-aim |
Wrangler / Gladiator (Solid)** | 35–37″ | 17×8.5, 0 to −12 mm | Set bump stops, watch fender flare clearance, consider steering/track-bar geometry |
F-150 / Silverado / RAM 1500 (IFS) | 34–35″ | 18×9, 0 to −12 mm | Air dam/valance trims, liners, UCAs to hit caster |
Headlight & speedo: After upsizing, re-aim headlights and recalibrate the speedometer (ABS/shift logic will thank you).
Pros & Cons (Why 3″ Rocks—and What It Demands)
Pros
- Real clearance gains: better breakover, approach, and departure.
- Bigger tires (34–35s on many platforms) for traction and diff clearance.
- Aggressive stance that signals capability.
Cons
- Higher cost/complexity: coilovers, UCAs, diff drop, lines/links, pro alignment.
- More trimming and setup time (wheel offset, bump stops, liner work).
- Geometry tuning required: caster targets, CV angles, steering feel; more parts to maintain.
Setup Targets & Quick Checks (Daily-Driver Friendly)
- Caster (IFS): Aim +3.5° to +4.5° for highway stability (platform-dependent; Jeeps often tolerate higher). UCAs make this achievable.
- CV angle: If you see boot weep or feel throttle vibes, consider a diff drop and recheck ride height.
- Droop travel: Don’t over-preload coilovers—protect down-travel to avoid top-out clunks.
- Bump stops: Set for your tire and wheel to prevent full-stuff damage.
- Torque map: Re-torque control arms, track/panhard, U-bolts, shock hardware, lugs at 500–1,000 mi.
Image Ideas (Keep Readers Engaged + Win Image SEO)
- “3″ lift parts spread” (coilovers, UCAs, diff-drop spacers, links, bump stops).
- Alt: 3 inch lift kit components coilovers upper control arms diff drop
- “34 vs 35 on 3″ lift” side profile with wheel offset notes.
- Alt: 34 vs 35 inch tires fitment on 3 inch lift with wheel offset
- “Caster & CV angle overlay” pre/post UCA + diff drop.
- Alt: caster target and cv angle diagram for 3 inch lift daily driver
Bottom line
A 3-inch lift is where your daily gains trail credibility—if you pair it with the right supporting parts and a thoughtful alignment. Get UCAs, set bump stops, mind wheel offset, and tune shocks to your real weight. Do that, and you’ll enjoy the extra inch eve
Side-by-Side Comparison (Put This as an HTML Table Near the Top)
Factor | 2″ Lift | 3″ Lift |
Daily comfort | Near-stock with good shocks | Slightly firmer/more motion |
Typical tire | 33″ | 34–35″ (platform-dependent) |
Trimming | Minimal | Moderate–significant |
Alignment | Often in spec | Often needs UCAs to hit caster |
CV/Driveline | Mild change | Noticeable; diff drop helps on IFS |
MPG impact | Low–moderate | Moderate–higher |
Total cost | $–$$ | $$–$$$ |
Who it fits | Daily/commuter, mild trails | Frequent trails, larger tires |
Tire Fitment Math — Diameter, Offset, Backspacing, and Rub Points
Bigger tires make rigs look mean and clear more trail—but they also change the arc your tire travels through and where it rubs. Here’s the no-fluff math and the real-world fixes so your daily stays happy.
How Diameter & Section Width Change the Arc (Where Rubs Actually Happen)
Plain-English rule:
More diameter (taller tire) pushes the contact patch forward/back at full stuff/lock → rubs the firewall, pinch seam, body/cab mount.
More width + more poke (negative offset) pushes the tire outward → rubs the fender lip, liners, crash bars, flare edges.
More width + more positive offset pushes the tire inward → rubs UCAs, sway bar, inner liner.
Quick tire math you’ll use:
Sidewall (in) = (section width mm×aspect)÷25.4(\text{section width mm} × \text{aspect}) ÷ 25.4(section width mm×aspect)÷25.4
Diameter (in) = rim+2×sidewall\text{rim} + 2 × \text{sidewall}rim+2×sidewall
Section width (in) ≈ mm÷25.4\text{mm} ÷ 25.4mm÷25.4 (varies with wheel width)
Examples:
285/70R17 → sidewall =285×0.70/25.4≈7.85″= 285×0.70/25.4 ≈ 7.85″=285×0.70/25.4≈7.85″ → Ø ≈ 32.7″, width ≈ 11.2″
315/70R17 → sidewall =315×0.70/25.4≈8.68″= 315×0.70/25.4 ≈ 8.68″=315×0.70/25.4≈8.68″ → Ø ≈ 34.4″, width ≈ 12.4″
Wheel width effect (handy rule):
Every +0.5″ of wheel width can change measured section width by ≈ +0.2″, which slightly changes rub points.
Rub map (front IFS):
Inner/at lock: UCA, sway bar
Rear of front well: firewall, pinch seam, body/cab mount
Outer edge: flare/lip, liners, crash bars (Bronco)
Wheel Specs That Actually Work (Offset & Backspacing Without Tears)
Offset 101 (mm):
Positive offset (+): wheel sits inward (tucks under).
Negative offset (−): wheel sticks outward (poke). Looks tough, increases rub on outer arc and increases scrub radius.
Backspacing 101 (in):
Distance from hub face to inner wheel lip.
More backspacing = more inboard (closer to UCA/sway bar).
Less backspacing = more outboard (poke; fender/liner rub).
Convert like a pro:
Use measured width = advertised width + 1″ (for lips).
Backspacing (in) ≈ (measured width÷2)+(offset mm÷25.4)(\text{measured width} ÷ 2) + (\text{offset mm} ÷ 25.4)(measured width÷2)+(offset mm÷25.4)
Example: 17×8.5 wheel (measured 9.5″), +0 mm offset
→ BS ≈ 9.5/2+09.5/2 + 09.5/2+0 = 4.75″ (nice all-rounder on many mid-size trucks)
Typical fixes (ranked from mild to spicy):
Heat-gun liner push + new push pins
Remove/trim air dam or crash bar (platform-dependent)
Pinch-seam massage (fold + seal)
Body/Cab Mount Chop (BMC) on some Toyotas
Caster adjustment (more positive caster pulls tire forward in the well)
Bump-stop tuning (solid axle) to protect at full stuff
Real-World Examples (Customize These to Your Catalog)
These aren’t absolutes—wheel width, actual tire brand sizing, and caster matter—but they’re solid starting points.
Tacoma / Frontier (IFS)
2″ lift: 33s (285/70R17) with +0 to +15 mm offset on ~8–8.5″ wheel; minor liner push, possible mild pinch-seam touch.
3″ lift: 34–35s with −12 to 0 mm offset on 8.5–9″ wheel; expect liner work + potential BMC and UCAs to hit caster.
4Runner / Bronco (IFS)
2″ lift: 33s easy on 0 to +15 mm; keep poke modest to reduce arc rub.
3″ lift: 34–35s with UCAs and liner/valance mods; Bronco may need crash-bar delete (trim kits available).
Wrangler / Gladiator (Solid Axle)
2″ lift: 35s often OK (factory flares/locks vary by trim); set bump stops correctly.
3″ lift: 35–37s with proper bump stops; consider re-gearing for drivability and tow manners.
Don’t forget: After size changes, re-aim headlights and recalibrate the speedometer (better shift logic, happier ABS).
Quick Fitment Decision Cheats (Daily-Driver Friendly)
Want minimal trimming and easy alignment? → 33s on +0 to +15 mm offset, 2″ lift.
Want 34–35s? → Plan 3″ lift, UCAs, careful offset (0 to −12 mm), and real trimming time.
Doing lots of highway? → Keep poke modest for better MPG, braking, and tramline behavior.
Bottom line
Fitment is a triangle: tire size × wheel specs × lift height. Get all three working together and your daily will steer straight, stop predictably, and look dialed—without sounding like it’s chewing its own fender liners at every U-turn.
Geometry 101 — Keep It Safe and Aligned
Lifting isn’t just “bolt stuff on and vibe.” It’s geometry. Get the numbers right and your daily drives straight, brakes predictably, and doesn’t eat boots or bushings. Here’s the cheat sheet—with plain English, a dash of humor, and the exact targets to hand your alignment tech.
Caster Targets (and Why UCAs Matter)
Caster = self-centering + straight-line stability.
On many IFS trucks/SUVs, post-lift happiness lives around +3.5° to +4.5° caster (platforms vary a little, but this window drives well at highway speeds).
Why lifts mess with it:
When you raise the front, factory control arms often run out of adjustment range.
Ball-joint angle can get sketchy at 3″, and the tire’s sidewall gets closer to the arm at full lock.
Enter UCAs (Upper Control Arms):
Add adjustment range so your tech can actually hit that +3.5° to +4.5° target.
Improve ball-joint/uni-ball articulation so you’re not riding the joint at weird angles.
Many aftermarket UCAs add built-in caster and extra tire clearance on big rubber.
Symptoms of not enough caster:
Wandering, poor return-to-center, “tramlining” (follows grooves).
Steering feels busy on the freeway. Your forearms know before your brain does.
Pro tip: Ask your shop for the before/after alignment sheet. If caster’s stuck around +2.0° after a 3″ lift on IFS, UCAs are the fix—not more toe-in.
CV Angles & Diff Drop
What changes:
Lifting an IFS front increases CV axle angle. More angle = more boot flex and heat.
Red flags:
Grease weep at inner/outer boots.
Clicking on turns or vibration on throttle (often 35–55 mph).
Oscillation that changes with load.
Diff drop (small spacers under the front diff):
Lowers the diff a bit to reduce CV angle, protecting boots and bearings.
Minimal ground-clearance penalty—usually less than the inch you gained in tire radius.
Not a cure-all for bad geometry, but often the right band-aid at ~3″ lifts.
Torque matters:
Re-torque axle nuts to spec after install/service. Too loose = bearing damage; too tight = premature wear.
Quick check: If vibes get worse with throttle and better when coasting, suspect CV/driveline angle, not wheel balance.
Droop vs Preload (Don’t Top-Out)
Definitions you’ll actually use:
Droop = available down-travel from ride height to full extension.
Preload = how much you crank the spring to raise the truck.
Why this matters:
Too much preload steals droop, causing top-out clunks, choppy ride, and less traction over washboard.
Spacer-only “tall” kits often look good in the driveway but feel stiff because down-travel is gone.
Targets & tuning:
Aim for at least ~2″ of droop on many mid-size IFS setups (measure hub-to-fender at ride height vs frame-jacked full extension).
Choose spring rate for your real weight (bumper/winch/battery). Over-springing = harsh; under-springing = bottom-outs.
Use longer-travel shocks/coilovers designed for lift height rather than cranking preload to the moon.
Set-and-forget test: If you hear a “clack” topping small speed bumps, add droop (reduce preload) or step into the right-length dampers.
Panhard/Track Bar (Solid Axle)
What it does:
The panhard/track bar laterally locates a solid axle. Lifting changes its angle and shifts the axle to one side.
Why you care:
Off-center axle = dog-tracking, steering wheel off-center, and tire rub on one side only.
Thrust angle goes out, and your alignment printout tattles on you.
Fix options:
Adjustable panhard bar to re-center the axle.
Or a relocation bracket to flatten the bar angle and restore roll center (common on rear of many SUVs/trucks).
After centering, re-check pinion angle, bump stop positions, and tire/fender clearances.
Driveway test: Measure tire-to-fender gap on both sides after a 2–3″ lift. If one side’s visibly tighter, panhard correction time.
Alignment Quick Sheet (Hand It to Your Tech)
Caster (IFS daily driver): +3.5° to +4.5° target (platform-dependent; Jeeps can tolerate higher).
Camber: near 0°, slight negative if spec allows.
Toe: small toe-in for highway stability.
Steering wheel: re-center after toe set (no crooked wheels, please).
Re-torque: control arms, track/panhard, shock hardware, U-bolts, lugs at 500–1,000 miles post-install.
Bottom line
Hit caster, protect CV angles, preserve droop, and re-center any solid axle. Do those four, and your lifted daily will feel planted on I-25, calm on washboard, and drama-free at full lock—exactly how a “built” rig should drive.
Daily-Driver Effects — Ride, MPG, Braking, and Noise
You didn’t lift your rig to suffer through white-knuckle commutes and mystery squeals. Here’s how a 2″ vs 3″ lift (and the tires you bolt on) changes what you feel every day—and how to keep it civilized.
Rotational Inertia & Braking — Why Bigger Tires Feel “Heavier” Than the Scale Says
When you add diameter and weight to wheels/tires, you increase rotational inertia (energy required to spin them) and unsprung mass. Translation: it takes more pedal to go and more pedal to whoa.
What you’ll notice
Longer stopping distances and more brake fade on long grades.
Slower acceleration and more gear hunting with autos, especially with 34–35s.
Daily-driver fixes that work
Pads/rotors: Step up to performance pads (quality semi-metallic or ceramic) and high-quality rotors; consider larger-diameter rotors if your platform supports it.
Brake fluid/lines: Fresh DOT 4 fluid (higher boiling point) and stainless braided lines improve pedal feel.
Wheel choice: A lighter wheel/tire combo can claw back a surprising amount of response—don’t carry extra pounds if you don’t need them.
Aerodynamics & Center of Gravity — MPG and Body Motion in the Real World
Lifts raise center of gravity (CG) and add frontal area/turbulence; rooftop toys add even more drag.
What you’ll notice
Small MPG loss per inch of lift, compounded by heavier, knobbier tires.
More body roll in corners and lane changes if damping/sway control isn’t matched.
Daily-driver fixes that work
Shock valving: Choose monotube shocks/coilovers valved for your actual weight (bumper/winch/rack).
Alignment & tire pressure: Correct caster and proper PSI reduce wandering and rolling resistance.
Aero discipline: Pull roof bins/lights when not needed; keep the bed closed/covered for smoother flow.
Tire Pattern, Compound & Noise — AT vs MT vs Hybrid “RT”
Tread pattern affects everything you feel.
All-Terrain (AT):
Best for commuting: quieter, lighter, lower rolling resistance.
Many offer 3PMSF (severe snow) and modern siping for wet grip.
Mud-Terrain (MT):
Maximum off-road bite, but heavier and louder.
Higher rolling resistance = MPG and braking penalties; can tramline more on grooved highways.
Hybrid “Rugged Terrain (RT):
Middle ground: chunkier than AT, quieter than MT. Great if you split time between highway and dirt.
Daily-driver tip: Don’t oversize tread aggressiveness for your use. A well-chosen AT on a 2″ lift often outperforms an MT on a 3″ in rain, snow, and braking.
Headlight Aim & ADAS — Don’t Be “That” Truck at Night
A lift points your beams higher and changes the angle of cameras/radars used by ADAS (lane keep, adaptive cruise, AEB).
Headlight aim (5-minute driveway fix)
Park on level ground ~25 ft from a wall.
Measure headlight center height; the low-beam cutoff should sit slightly lower on the wall (check your owner’s manual for exact spec).
Adjust vertical screws until the cutoff lands at spec. Your neighbors will thank you.
ADAS sanity checks
After significant lift/bumper changes, some vehicles require static or dynamic calibration so radar/cameras aim correctly.
Watch for dash warnings or misbehavior (lane-keep tugging, false AEB). If present, book a calibration with a shop that has the right targets/scanner.
Quick Wins & Red Flags (Daily-Driver Cheatsheet)
Quick wins
Quality monotube shocks, correct caster (+3.5° to +4.5° on many IFS rigs), modest wheel offset, speedo recal, headlight re-aim.
Re-torque suspension hardware at 500–1,000 miles after install.
Red flags
Top-out clunks over small bumps (not enough droop / too much preload).
Vibration on throttle (CV angle issue), or wandering at highway speeds (low caster/toe).
Sustained brake smell/fade on grades (rotational mass + stock brakes = upgrade time).
Bottom line
Lift height sets the look; setup sets the manners. Keep rotational mass reasonable, tune damping for your weight, choose tread that fits your life, and re-aim/recalibrate the smart stuff. Do that, and your lifted daily will feel composed Monday-through-Friday and still be ready to play on Saturday.
Towing, Payload, and Real-Life Use
Lifts don’t just change how your rig looks—they change how it tows, hauls, and squeezes into parking garages. Here’s how to keep your daily driver calm, confident, and level when real life shows up with trailers, gear, and low ceilings.
Know Your Weights (GVWR, Payload, Tongue Weight—The “Don’t-Guess” Basics)
GVWR = max truck weight with people + fuel + cargo + tongue weight.
Payload = what you can carry in/on the truck (on the door jamb). Lift kits don’t change the number, but heavier wheels/tires/armor eat into it.
Tongue weight (TW) = 10–15% of trailer weight for most travel/utility trailers (boat trailers often closer to 8–12%).
Scale it: Hit a CAT scale once; know your front/rear axle loads with and without the trailer. Data beats vibes.
Quick sanity: If your truck sits nose-high when towing, you’re light on TW (hello sway). If the rear squats like a tired labrador, you need support (see below).
Rear Sag Solutions — Air Bags vs Add-a-Leaf (and Shock Tuning)
Air helper bags:
Best for variable loads (work week vs weekend).
Set 5–8 psi empty, add pressure until level when loaded.
Use internal jounce bump or Daystar cradles on off-road builds to keep articulation.
Add-a-Leaf (AAL) / Progressive leaf packs:
Adds constant spring rate (great if you always carry gear).
Slightly firmer ride empty; more composure with tongue weight.
Bump-stop tuning:
Progressive bump stops (foam/jounce) engage smoothly under load—less “slam,” more control.
Shock compression (the secret sauce):
Heavier loads = more low-speed compression control. If you run adjustable or properly valved monotubes, add a click or two for towing days.
Measure before/after: Hub-to-fender height at all four corners. Aim to keep ~1–1.5″ of rake (rear higher than front) when loaded to maintain braking/steering balance.
Sway Control & Stability — Keep It Arrow-Straight
Tongue weight first: 10–15% cures most sins. Too light → sway. Too heavy → squat.
Weight-distribution hitch (WDH): On heavier travel trailers, a WDH moves load to the front axle—steering and headlights thank you.
Friction or cam sway control: Adds resistance to yaw for crosswinds and semis.
Tire pressure: Run door-jamb pressures when empty; for towing, bump rear PSI (within sidewall max) to reduce sidewall flex.
Sway bars (truck): Heavier rear bar = flatter, but mind articulation if you wheel—use disconnects where applicable.
Speed discipline: The best anti-sway device is your right foot. If it wiggles, ease off—don’t “steer the snake.”
Hitch Height & Drop/Rise — Getting the Trailer Level After a Lift
A 2″–3″ lift usually means your old ball mount is now too tall.
How to set it right
Park trailer level on flat ground; measure coupler height (to the bottom of the coupler).
Measure your truck’s hitch receiver height (center of receiver).
Drop/Rise = receiver height − coupler height → choose an adjustable drop/rise ball mount that covers this range.
Pro notes
Keep the trailer level or slightly nose-down for stability and braking.
Ball size & rating matter: 2.0″, 2-5/16″—match the coupler, and torque the nut to spec.
Confirm Class III/IV ratings cover your GTW (gross trailer weight) and TW with margin.
Trailer Brake Controller Settings — Make It Stop Like a Grown-Up
Proportional controllers > time-delay for smooth, speed-matched braking.
Gain setup: In a safe lot at 20–25 mph, manual-apply the trailer brakes:
If the trailer locks first, reduce gain.
If the truck does all the work, increase gain.
Boost modes: Heavier trailers often like one step of boost for initial bite.
Checks: Test the breakaway switch, confirm 7-pin charging, and inspect ground and magnet wires before big trips.
Real-Life Logistics — Garages, Racks, and “Will It Fit?”
Overall height math:
Truck height after lift + tire radius change + rack/RTT/light bar = new total.
Write it on a dash sticker (e.g., “Total Height: 84.5″”). Saves mirrors and pride.
Parking garages & home garage:
Most garages are 80–84″ clearance. A 3″ lift + 35s + rack can push you over—know before you swipe the pass.
Driveway & ferry ramps:
Longer wheelbase + lift = better breakover, but long hitches still scrape. A long-shank adjustable hitch can help with ramp angles (and carry a skid plate).
Roof loads:
Respect the dynamic load rating of racks; heavy RTTs change CG. Use ratchet straps you trust and re-torque rack hardware.
Daily-Driver Tow/Haul Checklist (Print-Friendly)
✅ Level the trailer with the right drop/rise.
✅ Set tongue weight 10–15% (use a scale or Sherline gauge).
✅ Adjust air bags/AAL until the truck sits level with some rake.
✅ Set controller gain with a 20–25 mph test and check boost.
✅ Bump rear tire PSI (within spec); confirm wheel torque.
✅ Re-aim headlights; verify turns/markers/brakes on the trailer.
✅ Know your overall height; bring a spare pin/clip and gloves.
Bottom line
A lifted daily can tow and haul beautifully—if you keep it level, dial tongue weight, set brakes, and know your height. Get those right and you’ll have a rig that’s comfortable Monday through Friday, confident on the highway, and still ready to camp on Saturday.
Cost Breakdown — What You’ll Actually Spend
Lifts look simple on Instagram. On invoices? Not so much. Here’s a no-surprises budget so you can plan like a pro, whether you’re going 2″ sensible or 3″ spicy.
Typical Budget (the Daily-Driver Value Play)
What’s in the cart
Spacer/level kit or entry coilovers, plus rear springs/AAL
Quality monotube shocks (front/rear)
Alignment (4-wheel)
Typical price ranges (parts + labor)
Spacer/level kit: $75–$350
Entry coilovers (pair): $800–$1,600
Rear springs / Add-a-Leaf: $120–$300 (AAL) • $250–$600 (coils)
Monotube shocks (pair): $300–$800 front • $250–$600 rear
Labor (install): 3–6 hrs @ $100–$180/hr ⇒ $300–$1,080
Alignment: $120–$250
Optional “nice to have”
Small crash-bar/liner tweaks: $0 (DIY heat-gun) – $250
Speedo recalibrator: $100–$250
Real-world total (common combos)
Budget 2″ (spacers + decent shocks): $750–$1,600 all-in
Premium 2″ (entry coilovers + rear spring + shocks): $1,800–$3,200 all-in
Why it’s cheaper: 2″ usually aligns within factory spec (no UCAs), keeps CV angles happy, and minimizes trimming time.
Typical Budget (more clearance = more supporting parts)
What’s in the cart
Coilovers (height-adjustable) + springs/leafs
UCAs (many IFS rigs need them to hit caster)
Diff drop (on lots of IFS platforms)
Extended links/lines (sway-bar, sometimes brake)
Bump stops (to protect full-stuff)
Pro alignment (+ speedo recal)
Typical price ranges (parts + labor)
Coilovers (pair): $1,200–$2,500
Rear leaf pack or coils: $300–$900
UCAs (pair): $400–$1,200
Diff drop kit: $60–$200
Sway links / brake lines: $80–$200 / $60–$150
Bump stops (pair): $100–$300
Labor (install): 6–10 hrs @ $100–$180/hr ⇒ $600–$1,800
Alignment: $150–$300
Speedo recal: $100–$250
Optional (but common with 35s)
Gears (both axles): parts $800–$1,200/axle + labor $800–$1,200/axle ⇒ $1,600–$2,400 per axle
Brake upgrade (pads/rotors): $300–$800 front • $250–$700 rear
Fender/liner work, crash-bar delete, BMC (Toyota): $100–$250 DIY • $300–$700 shop
Real-world total (common combos)
Well-sorted 3″ (coilovers + UCAs + bits): $2,800–$5,500 all-in
35s with supporting mods (add gears/brakes/trimming): $4,500–$8,500+ all-in
Why it costs more: You’re paying to restore geometry (UCAs, diff drop), protect travel (bump stops/lines), and tune manners (alignment + valving) so it drives like a grown-up.
Hidden/Recurring Costs People Forget
Mount/balance big tires: $100–$200 set
Fluids & hardware: $30–$80 (Loctite, new nuts/bolts)
Headlight aim & ADAS calibration: $0 DIY aim, $150–$350 for pro calibration if required
Fuel: +1–2 mpg penalty is common with bigger/heavier tires
Maintenance: CV boots, ball joints, tie-rods see more angle/load; inspect more often
Save vs Spend (smart places to allocate budget)
Spend on: Shocks/coilovers (ride + control), UCAs (caster), alignment (numbers matter), brakes (with 34–35s), gears (if it hunts).
Save on: Extreme wheel poke (causes rub + scrub), spacer-only “tall” solutions (steal droop), random impulse lighting that adds wind drag.
Pro Tip Box
Re-torque everything after 500–1,000 miles, then at each oil change:
control arms, track/panhard bar, u-bolts, shock mounts, wheel lugs. It’s the cheapest insurance you’ll ever buy.
Bottom line
A 2″ lift keeps budgets tame and manners stock-ish. A 3″ lift unlocks real clearance and bigger tires—if you fund the supporting parts that keep geometry, braking, and alignment in the green. Plan the whole system, not just the springs, and your wallet (and commute) will thank you.
Install & Setup Checklist (Printable)
You’re about to turn bolts, not start a guessing game. Use this step-by-step checklist to keep your lifted daily safe, aligned, and drama-free. (Yes, there’s a printable one you can toss on the toolbox.)
Pre-Install Measurements (Hub-to-Fender, Rake)
Measure hub-to-fender height at all four corners (LF, RF, LR, RR) and write it down.
Note your rake (rear minus front). Target ~1–1.5″ of rake loaded to keep braking stable.
Estimate added weight (bumper/winch/rack) so you pick the right spring rate.
Snap a pic of cam-bolt positions (nice baseline if you need to retrace steps).
Torque Specs & Blue Loctite (Where It Belongs)
Follow factory/brand torque specs—especially for control arms, which should be torqued at ride height.
Blue Loctite: strut top nuts (if spec allows), shock bolts, sway links, U-bolts.
Do not Loctite cam bolts unless your manufacturer says so—you’ll need them free for alignment.
Re-torque at 500–1,000 miles, then every oil change (control arms, track/panhard, U-bolts, shock mounts, wheels).
Alignment Targets & Steering Wheel Centering
Caster: many IFS rigs drive best around +3.5° to +4.5° post-lift (UCAs often required at 3″).
Camber: near 0° (slight negative only if your spec calls for it).
Toe: a small toe-in for highway stability.
Center the steering wheel and save the before/after alignment sheet like a receipt from a fancy steakhouse.
Headlight Aim + Speedo Recal (Be Nice to Other Drivers)
Park ~25 ft from a wall and re-aim headlights to your manual’s spec (your neighbors will stop flashing you).
Recalibrate speedometer for tire size (tuner/programmer) and verify with GPS so your shift points/ABS behave.
If your rig has ADAS (lane-keep, adaptive cruise, AEB), schedule camera/radar calibration after big height/bumper changes.
Post-Install Test Drive (What to Check, in Order)
0–25 mph: Listen for clunks (top-out or loose hardware).
Full-lock circles in an empty lot: mark any rubs (liner, crash bar, pinch seam).
45–60 mph: Feel for vibration on throttle (CV angle) or wander (caster/toe).
Brakes: Bed pads/rotors if new; watch for ABS/TPMS lights.
After 50–100 miles, quick re-torque; at 500–1,000 miles, do a full re-torque map.
Decision Tree — Pick Your Lift in 60 Seconds
You don’t need a PhD to choose a lift—just answer a few real-life questions. Follow this quick flow and you’ll land on the right setup without buyer’s remorse (or chewed fender liners).
The 60-Second Flow (Yes/No—go with your gut)
Is your driving ≥ 70% commuting/highway?
→ Yes: lean 2″ lift + 33s + quality monotube shocks.
→ No: go to 2.Do you want 35s (or frequent rocks/sand)?
→ Yes: 3″ lift + UCAs + trimming, consider diff drop (IFS) and gears.
→ No: go to 3.Do you tow often (or carry bed/rack weight)?
→ Yes: 2″ lift with helper springs/air bags, keep center of gravity modest.
→ No: go to 4.Live with regular snow/ice?
→ Yes: prioritize tire compound & siping (AT with 3PMSF) over height; 2″ + 33s wins for control.
→ No: go to 5.Willing to trim liners/body mounts and tune geometry?
→ Yes: 3″ unlocks 34–35s (platform-dependent) + real clearance.
→ No: 2″ is your sweet spot—stock-ish manners, minimal drama.
Cheat code:
Mostly commuting + weekend gravel? → 2″ + 33s + good shocks
Frequent rocks/sand + wants 35s? → 3″ + UCAs + trimming + (maybe) gears
Towing often? → 2″ with helper springs; keep CG modest
Snow/ice life? → Tires > height (3PMSF ATs beat tall MTs)
Quick Fitment Gatekeepers (Don’t Skip These)
Garage/parking clearance: Add lift + tire radius + rack/RTT. If you use parking garages, 2″ is safer.
Alignment reality: 3″ on IFS often needs UCAs to hit +3.5°–+4.5° caster.
CV angles (IFS): 3″ likely benefits from a diff drop; watch for boot weep/clicks.
Wheel offset sanity: Minimal poke (0 to +15 mm on many mid-size IFS) = less rub = happier daily.
Profiles (Pick your persona)
The Commuter with Camp Dreams
2″ + 33s + monotubes, alignment, headlight re-aim.
AT tires, mild offset. Drives like stock, looks right.
The Weekend Rockhound
3″ + UCAs + bump stops + careful offset, plan on trimming.
34–35s, maybe gears and brake upgrade.
The Tow Boss
2″ + helper springs/air bags, proportional brake controller, correct drop hitch.
Keep rake ~1–1.5″ loaded for braking stability.
The Snow State Daily
2″ + 33″ 3PMSF ATs; siping > sidewall flex.
Keep poke modest for clean tracking and better slush clearing.
Bottom line
If you value simple alignment, minimal trimming, and stock-like manners, you’ll love 2″ + 33s. If you’re chasing real clearance and 35s, budget for 3″ + UCAs + trimming (and maybe gears). Answer the five questions above honestly and you’ll pick the right lift the first time.
Common Mistakes (and Easy Wins)
Lifted trucks don’t fail spectacularly—they usually annoy you to death with squeaks, rubs, and weird steering. Here are the traps people fall into (and the quick fixes that make your daily feel dialed).
Spacer-Only at 3″ — Top-Out & No Droop
The mistake: Cranking height with tall spacers or preload only.
Symptoms: “Clack” over speed bumps, choppy ride, front end skitters on washboard.
Why it happens: You stole down-travel (droop), so the shock tops out constantly.
Easy win: Run proper-length coilovers/shocks for 3″, set spring rate for real weight (bumper/winch), and keep ~2″ of droop.
Wrong Wheel Offset — Rubbing Even at 2″
The mistake: Deep negative offset for “the look.”
Symptoms: Rubs at fender lip/liner on turns and compression, steering pull from scrub radius.
Why it happens: More poke increases the tire’s arc path into things.
Easy win: Choose conservative specs (many mid-size IFS rigs like 0 to +15 mm on 8–8.5″ wheels with 33s). Trim a liner? Fine. Body-mount chop? Only if you must.
Skipping UCAs When You Need Caster Range
The mistake: Lifting IFS to 3″ and keeping stock arms.
Symptoms: Highway wander, poor return-to-center, alignment sheet stuck at +2.0° caster.
Why it happens: Factory arms run out of adjustment and ball-joint angle.
Easy win: Install Upper Control Arms (UCAs) with added caster. Target +3.5° to +4.5° caster (platform-dependent) and enjoy adult-level steering.
Ignoring Bump-Stop Spacing with Big Tires
The mistake: 34–35s on stock bumps.
Symptoms: Full-stuff fender carnage, sliced liners, bent pinch seams.
Why it happens: The tire needs compression travel room you didn’t budget.
Easy win: Set bump stops for your tire/wheel combo (progressive/jounce stops are great). Pair with the right offset so you protect sheet metal without killing up-travel.
Not Re-Aiming Headlights or Recalibrating Speedo
The mistake: New stance, old aim and speedo.
Symptoms: Getting flashed at night; speedo reads low; weird ABS/shift logic.
Why it happens: Lift raises beam angle and bigger tires change tire circumference.
Easy win: Re-aim headlights at ~25 ft per the manual, and recalibrate speedometer/TPMS with a tuner. If you changed bumper/height a lot, schedule ADAS calibration.
Bonus “Sneaky” Mistakes (Quick Fixes)
Forgetting re-torque: Suspension hardware and u-bolts need a 500–1,000-mile re-torque, then every oil change.
Too little tire pressure: Under-inflated 35s wander and run hot. Set PSI for load, not vibes.
Over-preloading coilovers: Height ≠ performance. If it rides like a pogo stick, back off preload and let shock valving work.
Bottom line
If you avoid these five mistakes, your lifted daily will track straight, stop confidently, and stay quiet—looking tough without driving you nuts.
FAQs
Short, honest answers you can actually use—and a ready-to-paste FAQ schema for rich results.
Will a 2″ lift hurt my daily ride?
Short answer: Not if you set it up right. With quality monotube shocks, proper droop, and a good alignment, most drivers report near-stock comfort. The quickest way to ruin it is a tall spacer-only setup that steals down-travel.
Can I run 35s on a 2″ lift?
Platform-dependent. On many IFS trucks it’s technically possible but usually requires heavy trimming, bump-stop tuning, and careful wheel offset. If you want hassle-free 35s, a 3″ lift (plus UCAs and trimming) is the safer, saner path.
Do I need UCAs for a 3″ lift?
On many IFS platforms, yes. Upper Control Arms restore caster range (target ~+3.5°–+4.5° for stable highway manners) and improve ball-joint/uni-ball angles so parts aren’t maxed out at ride height.
How much MPG will I lose?
Tires matter most. The lift itself is a smaller hit than jumping to heavier, knobbier tires. Expect a modest loss from height and aero, with the bigger penalty coming from rotational mass and tread pattern (MTs > ATs).
Will my warranty be void?
Thanks to Magnuson-Moss, a manufacturer must show that your mod caused the failure to deny coverage. Keep receipts, install docs, and stay within the maintenance schedule. (Local dealer policies vary, so be courteous and informed.)
Is re-gearing required for 35s?
Not always, but it often restores drivability, shift points, and towing manners—especially on mid-size trucks and taller final gear ratios. If the transmission gear-hunts or uphill performance feels flat, gears are your best upgrade.
Pro tip: Add a small “Need help?” line under the FAQ inviting readers to post their year/make/model/trim and tire/wheel goals in the comments—you’ll spark engagement and show hands-on expertise.
Recommended Next Steps (CTAs + Internal Links)
Free Fitment Help — Drop Your Specs, Get a Tailored Parts List
Tell us your year / make / model / trim, current wheel/tire, and what you want to run (33s, 34s, 35s). Add how you drive (commute, towing, rocks). We’ll reply with a parts list + wheel offset guidance + trimming notes so your daily drives straight and doesn’t chew liners.
Shop the Exact Parts You’ll Need
Suspension & Lift Kits: /shop/suspension
Upper Control Arms (Caster Fix): /shop/upper-control-arms
Wheels & Tires (Fitment-Friendly): /shop/wheels-tires
Recovery Gear (be ready on the trail): /shop/recovery-gear
Gearing & Drivetrain Upgrades: /shop/gearing
Grab the Worksheet — Plan Your Lift Like a Pro
Print this Lift & Fitment Worksheet (PDF) and jot everything down during install/alignment: tire math, wheel offset, caster targets, rub notes, headlight aim, speedo recal—so nothing gets missed.
What to Do Next (60-Second Game Plan)
Comment your specs → get your custom parts list.
Add what you need to cart from the links above.
Print the worksheet and bring it to your installer.
- After install, post your before/after in the comments—we’ll help fine-tune caster, offset, and bump-stop spacing if needed.


